Fretboard Orientation 1
This article and video is about learning your way around the fretboard through a few simple orientation techniques. These will not only improve your knowledge of the fretboard but also help with learning scales and arpeggios and most importantly aid sight reading.
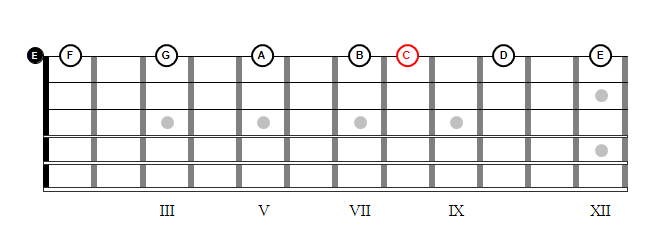
For a lot of guitarists knowing the notes across the fretboard seems like the most painful and daunting task ever imaginable; moving out of first position (especially whilst reading) to play anything higher up the fretboard takes on the feel of helping Frodo journey into Mordor. It really shouldn’t be this way. So outlined below are a few guaranteed exercises; mapping the natural notes, octave displacement and creative visualization, which will help you navigate the frets. It is all about learning your way around the fretboard’s geography through orientation points, so lets shine some light onto the dark depths of the fretboard.
One String Scales
These are the first things I teach any new student and they quickly become a source of hilarious mental gymnastics; this also a great exercise for learning those pesky notes higher up the fretboard. So here is your chance: try playing up string 1, saying the natural notes out loud. Easy right! OK, now do the whole thing backwards; say and play the notes from fret 12 back down on to the open string. Slightly more challenging? Good.

Your first attempt up the string relies on your memory of the alphabet, something you had learned by the time you were five years old. Reversing the notes forces your brain to associate the musical alphabet with a fret position and relearn the notes. You could do all six strings in one day but I suggest two strings a day. Up and down: say and play!
Octaves Displaced No. 1
How many octaves can you find in one position? The answer should be three, with a slight stretch. (Yes, technically there are 4 and you don’t need to stretch for the other octave, however for learning the fretboard ignore that F note on string 1, for the moment) Upon further examination you should also find that there are two places possible to find these three octaves. Lets do an example to get a clear idea. The note F can be found in position 1 on strings 6, 4 and 2 (the stretch bit); notice the shape these notes make: 3 frets across, 2 strings down, 4 frets across, 2 strings down.

Can you find another F to do this in?
Yup, position VII. Some shape, just a string down.

This handy bit of information should now be in coded into all your two octave scale and arpeggio patterns (see the misc. scales section in the video for a demonstration). Most, if not all go through these orientation points. Not only does this help you learn the notes but all so helps when under pressure, in say an exam or audition, and your mind temporarily goes blank!
Octaves Displaced No. 2
So using the information above we are going to play each note one after the other, but….with each note on its own string. You are going to bounce into each note across the two positions thus covering three octaves; white note into black note up (and down) the fretboard. Again notice the shape this makes on the fretboard, as outlined below. Notice I have added that missing F note. Why? Well it can be utilized in this bounce exercise on the way back down through the octaves. Note there is a definable pattern to these notes: 7 frets up, 5 frets back (apart for between strings 3 & 2; just subtract a fret because of the tuning)

To effectively practice this exercise use a metronome set to a low BPM such as 40, 50 or 60. This will help with timing and rhythms. Aim to think ahead of the note you have to the next, and make sure you know what note you are on at any given moment. If you have to: say and play!
The Endless Stairs
Now a warning, like Frodo taking on the stairs above Minas Morgul, there are certain paths you do not want to tread. Apart from neatly tying in the Lord Of The Rings analogy from above, what does this actually mean?
It means: do not practice these exercises with consecutive notes, such as E followed by F followed by G etc. You will learn nothing except the shapes. Practice it in cycles of three (chords), four (cadences) or five (progressions). This will cement the theoretical concepts in brackets into your brain (and fingers) along with the shapes and the fretboard geography i.e. the actual notes. It does this because you are challenged constantly to think about what note you are on and what note you are heading to; which makes for more focused learning. Otherwise you might as well be on the endless stairs for all the good it will do as you continuously go over the same ground with no definable learning taking place, just muscle memory being exercised. You have to engage more than just your fingers when practicing!
Fretting The Fret
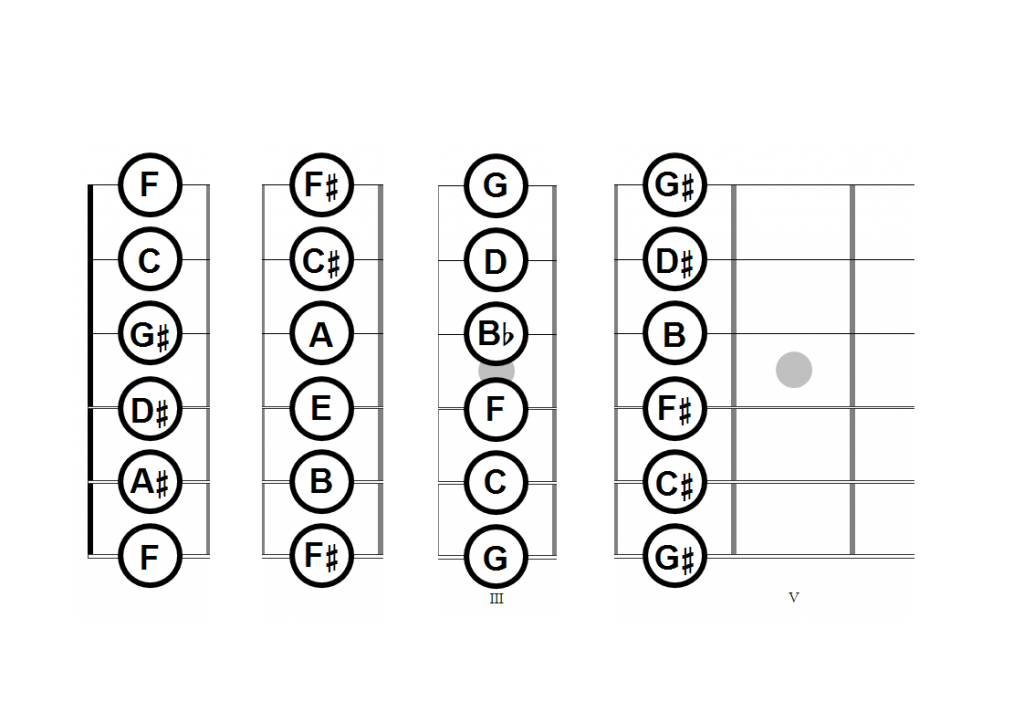
This is the first half of a cross over creative visualization and finger independence exercise. Begin at fret 1 and play each note in that fret up and down; again say and play. First one finger at a time, then two fingers; so finger 1, then finger 1 & 2. Next fret begins with finger 2, then 2 & 3, etc. Say and play sharps on the way up the fretboard, flats on the way down. Practice this exercise up and down the fretboard one position at a time; its possible to cover the entire fretboard in three days: one position a day ( I V IX).

Realize The Fret
This is a great creative visualization exercise to do just before going to sleep. Why such a particular time? Well, the brain is more receptive to processing information across the conscious and subconscious divide; it also allows the information to be organized whilst you are sleeping. Taking the exercise from above, mentally review and go through each fret, one at a time, saying the name and visualizing the note on the string; as if you were looking at the fretboard, just in your minds eye. You can play the note, look at the note, hear the note and feel the note without actually physically playing the note; amazing thing our brain.
 Creative visualization purposefully harnesses the power of imagery to cement ideas or concepts into the brain. For further details on creative visualization Shakti Gawain‘s book below…
…is highly recommended. If you are still not convinced try out this article from The Bulletproof Musician blog site, it deals with mental practice for injured musicians. Another great site is Health Ambition, with a wide range of articles that deal with, no surprise, healthy living; check out this post on effective techniques for concentration.
Coda
Key to getting this, and all of these exercises is saying and playing the notes. The minute you skimp on that and start day dreaming about the rest of your day stop regroup and begin again. Mental focus is crucial for all these exercise to become established and thus move from laborious new information to established comfortable facts. Check out the video above for a visual run through of each exercise.
There are more advanced exercises and creative visualization techniques to further cement the fretboard into your fingers which we will delve into at a later date however these rely on knowing the fretboard notes already. For now if you are wondering what to do next get some sight reading out, nail the key across the fretboard with octaves, one string scales (in key), arpeggios and 2 octave scales and then dive in. Hopefully you should feel more comfortable with the fretboard. Alternatively check out the #CGRocks CAGED system article and see if you can say and play the pentatonic scale in C major across the fretboard.


